I enjoy mixing traditional crafts with tech. A while ago I decided to teach myself crochet, mostly using YouTube and a couple of crochet books. I found a pattern for a crochet robot toy and decided that instead of just crocheting buttons and a light, I’d use sewable electronics instead.
The crochet pattern came from Issue 16 of Simply Crochet.
I used a CR32 coin cell battery holder, battery, sewable steel thread and a large red LED for the light on the robot’s head.
To sew the light on, I pushed the legs of the LED through the top of the crocheted head and then used round nose pliers to coil each leg out to the side, flat against the crochet. On the inside of the head, I stitched from the negative terminal of the battery holder, lightly through half of the thickness of the crochet (so the thread didn’t show on the outside of the robot) to the negative leg of the LED. When sewing through the coil of the leg of the LED, I sewed knots as I went, as the steel thread has a bit of spring to it, and so wants to open up, but this can break the connections in your circuit. I did the same thing, with a separate piece of steel thread, for the positive side of the LED and battery.
The buttons on the front of the robot are a bit more involved. They needed 2 battery’s worth of power and a LilyTiny circuit board to create the flashing. The batteries are connected to the LilyTiny and then the LilyTiny is connected to the LEDs. Although the LilyTiny is designed for 4 LEDs, I connected more, in parallel, as I had more than 4 buttons that needed illuminating. The default patterns programmed into the LilyTiny were fine, so I didn’t need to reprogramme it.
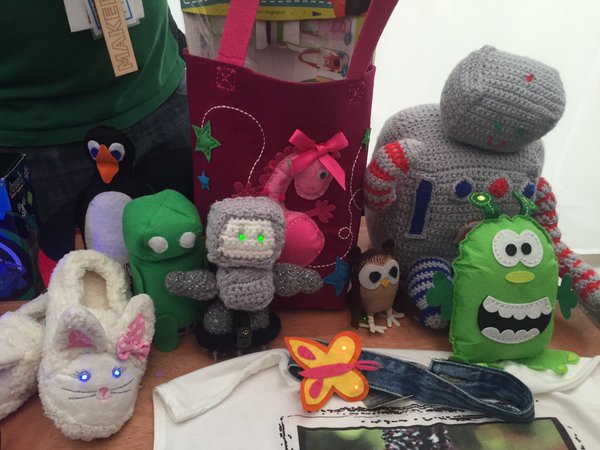
The end result is here:
More LED crochet
I followed that project up with some a monkey & ninja from the Creepy But Cute crochet book and a pirate pattern from the author’s website. Rather than sewing their expressions on, I gave them sewable LED eyes. These were added behind the felt patches that are their faces. The battery holder is under each creature, which has meant I’ve needed to add a ring of chain stitch to the base, to hide the holder and stabilise each creature.
More recently, I made the robot from the Creepy But Cute book. Gee made a small circuit with cyclon style red LEDs that I used for its eyes. As these aren’t sewable LEDs and they’re tiny, it needed the crochet cutting so that they’d show through the felt face. The felt face stops the crochet from unravelling, so no problems there. At some point I may remake this but use a Adafruit Gemma / Flora to control sewable LEDs for the cyclon effect but I’ll need to find the time first!
The complete set is here:
They get taken to Make Faires with Pimoroni and recently featured in Makezine’s photos of the Berlin Faire.
All sewable electronics parts for the various projects came from Adafruit / Sparkfun / Kitronik via Pimoroni.